> ## Documentation Index
> Fetch the complete documentation index at: https://docs.edisglobal.com/llms.txt
> Use this file to discover all available pages before exploring further.
# How to Change IP Address in Windows Server
> Change the IP address on a Windows Server VPS using Network Connections or PowerShell. Step-by-step guide covering static IP, gateway, and DNS configuration.
export const CtaButton = ({label, link, openInNewTab}) => ;
## Quick Guide on How to Change IP Address on Windows Server via VNC
Here’s a revised guide on how to change the IP address on Windows Server, specifically tailored for users who are connected via VNC.
## Change IP address on Windows server
Enable your VNC server: Follow the instructions
here
.
### **Step 1: connect to your Windows server via VNC**
[VPS Management Portal](https://manage.edisglobal.com/clientarea.php)
Follow the instructions
[here](https://docs.edisglobal.com/enable-vnc-server)
* Press `Ctrl + Alt + Delete` to open the Windows login page. Also you can
Use the top key.(send CtrlAltDelete) - Enter your username and
password.
***
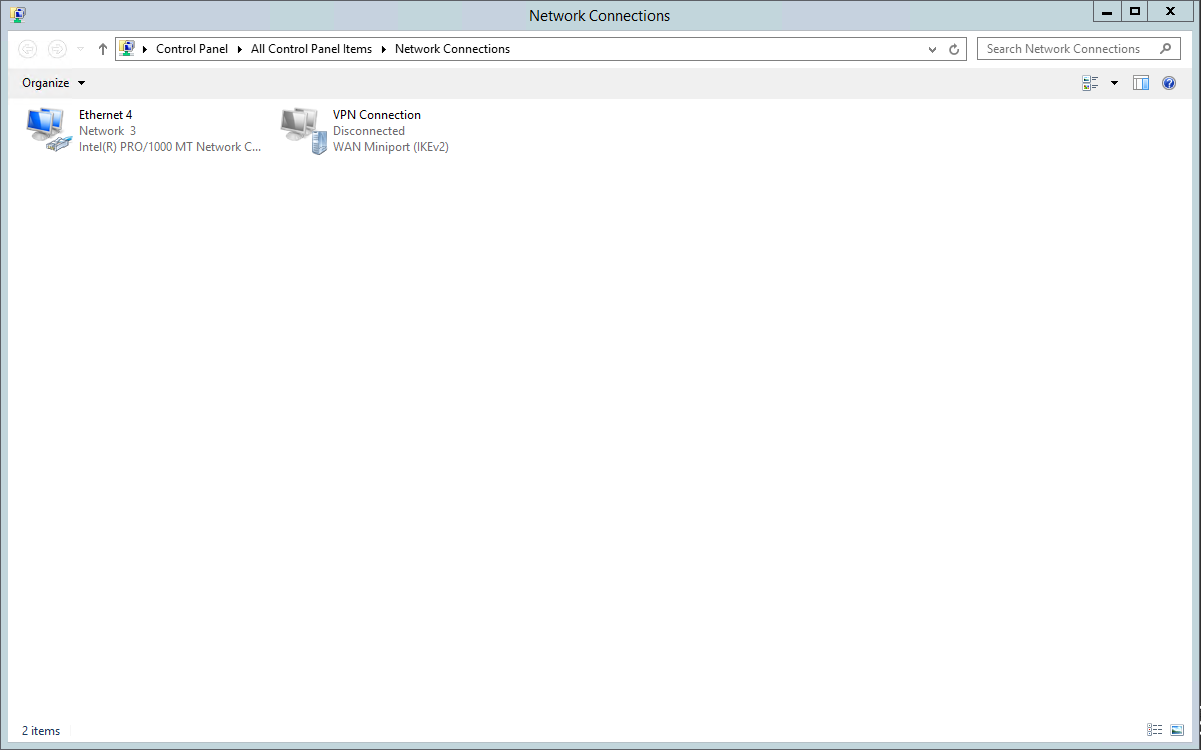
### **Step 2: open network connections**
1. Once connected, right-click on the **Start** button and select **Run**.
2. Type `ncpa.cpl` and press **Enter**. This will open the **Network Connections** window.
***
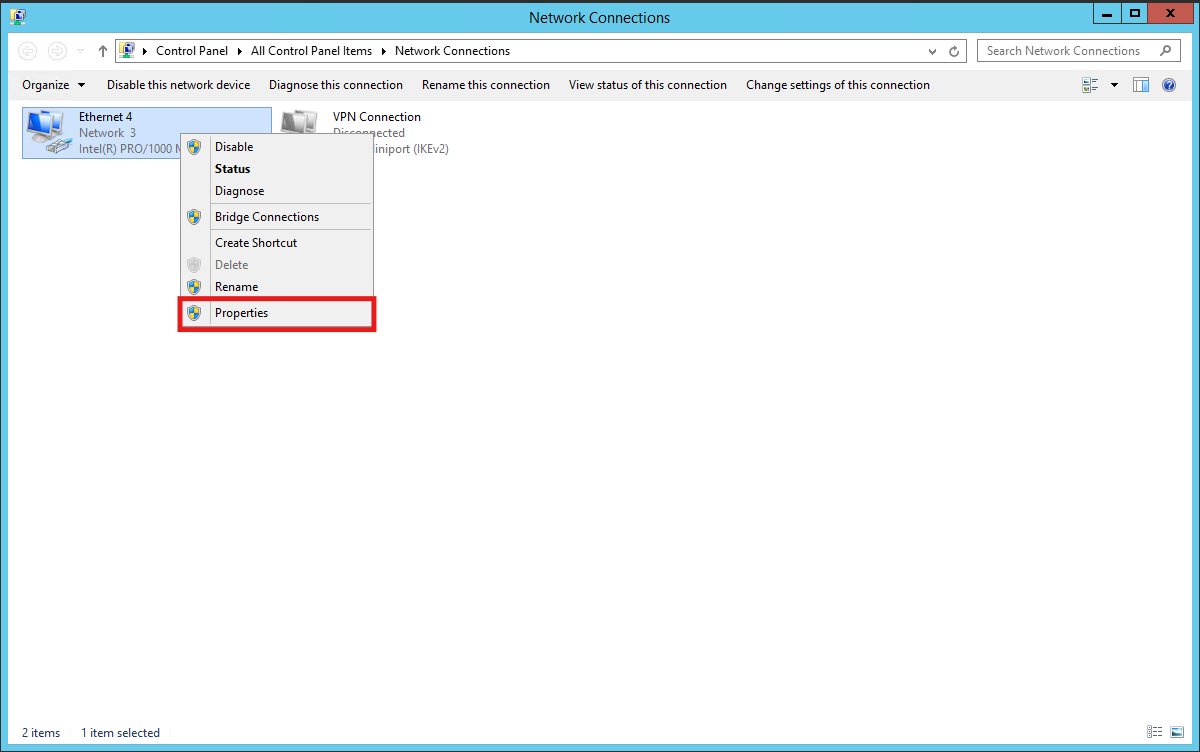
### **Step 3: access properties of the network adapter;**
1. In the Network Connections window, find the network adapter you wish to configure (e.g., Ethernet).
2. Right-click on the adapter and select **Properties** from the context menu.
***
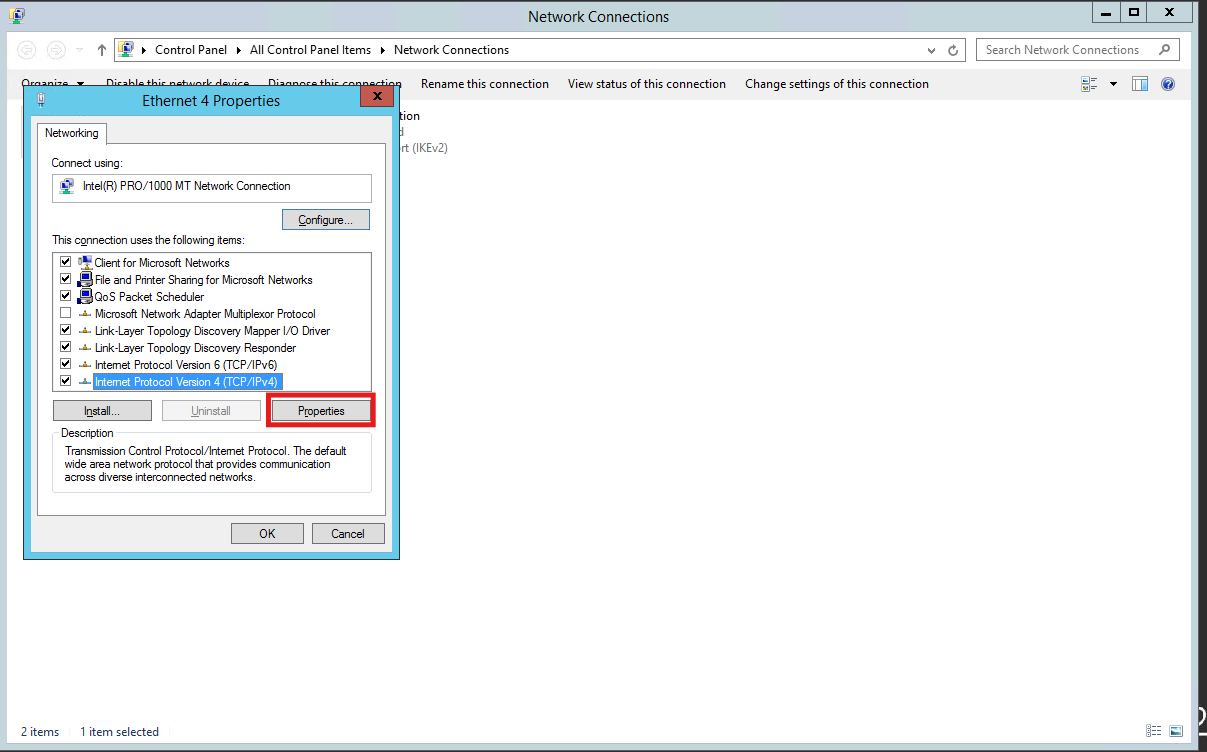
### **Step 4: select internet protocol version**
1. In the Properties window, locate and select **Internet Protocol Version 4 (TCP/IPv4)**.
2. Click the **Properties** button.
***
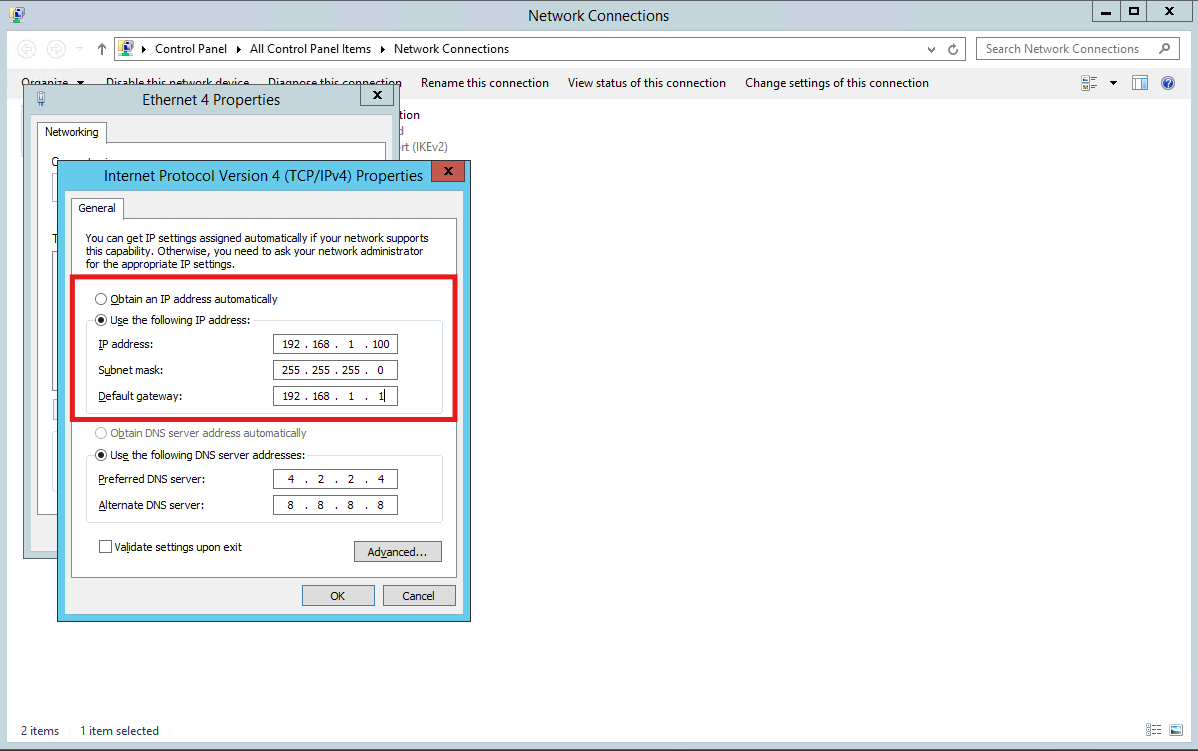
### **Step 5: change the IP address**
1. In the TCP/IPv4 Properties window, select **Use the following IP address**.
2. Enter your desired **IP address**, **Subnet mask**, and **Default gateway**. For example:
* **IP address**: `192.168.1.100`
* **Subnet mask**: `255.255.255.0`
* **Default gateway**: `192.168.1.1`
***
### **Step 6: configure DNS servers (optional)**
1. If needed, select **Use the following DNS server addresses**.
2. Enter your preferred **DNS server** (e.g., `8.8.8.8` for Google DNS) and an **alternate DNS server** (e.g., `8.8.4.4`).
***
### **Step 7: save changes**
1. Click **OK** to close the TCP/IPv4 Properties window.
2. Click **Close** in the Network Adapter Properties window.
***
### **Step 8: verify the changes**
1. Open **Command Prompt** or **PowerShell** by right-clicking the Start button and selecting it from the menu.
2. Type the following command and press **Enter**:
`ipconfig`
3. Check the output to confirm that your new IP address is correctly set for the network adapter.
***
### Important Notes
* **Admin Privileges**: Changing network settings requires administrative privileges. Ensure you have the necessary permissions.
* **Backup Settings**: Always note your previous network settings before making changes, in case you need to revert back.
***
#### Fast Windows VPS — ready in minutes
Spin up a secure Windows VPS with 2 vCPUs or more. Instant setup, full administrator access, and reliable global performance.
Select your preferred hosting location, plan, select Windows OS at checkout, and start with full RDP access.
 ***
### **Step 3: access properties of the network adapter;**
1. In the Network Connections window, find the network adapter you wish to configure (e.g., Ethernet).
2. Right-click on the adapter and select **Properties** from the context menu.
***
### **Step 3: access properties of the network adapter;**
1. In the Network Connections window, find the network adapter you wish to configure (e.g., Ethernet).
2. Right-click on the adapter and select **Properties** from the context menu.
 ***
### **Step 4: select internet protocol version**
1. In the Properties window, locate and select **Internet Protocol Version 4 (TCP/IPv4)**.
2. Click the **Properties** button.
***
### **Step 4: select internet protocol version**
1. In the Properties window, locate and select **Internet Protocol Version 4 (TCP/IPv4)**.
2. Click the **Properties** button.
 ***
### **Step 5: change the IP address**
1. In the TCP/IPv4 Properties window, select **Use the following IP address**.
2. Enter your desired **IP address**, **Subnet mask**, and **Default gateway**. For example:
* **IP address**: `192.168.1.100`
* **Subnet mask**: `255.255.255.0`
* **Default gateway**: `192.168.1.1`
***
### **Step 5: change the IP address**
1. In the TCP/IPv4 Properties window, select **Use the following IP address**.
2. Enter your desired **IP address**, **Subnet mask**, and **Default gateway**. For example:
* **IP address**: `192.168.1.100`
* **Subnet mask**: `255.255.255.0`
* **Default gateway**: `192.168.1.1`
 ***
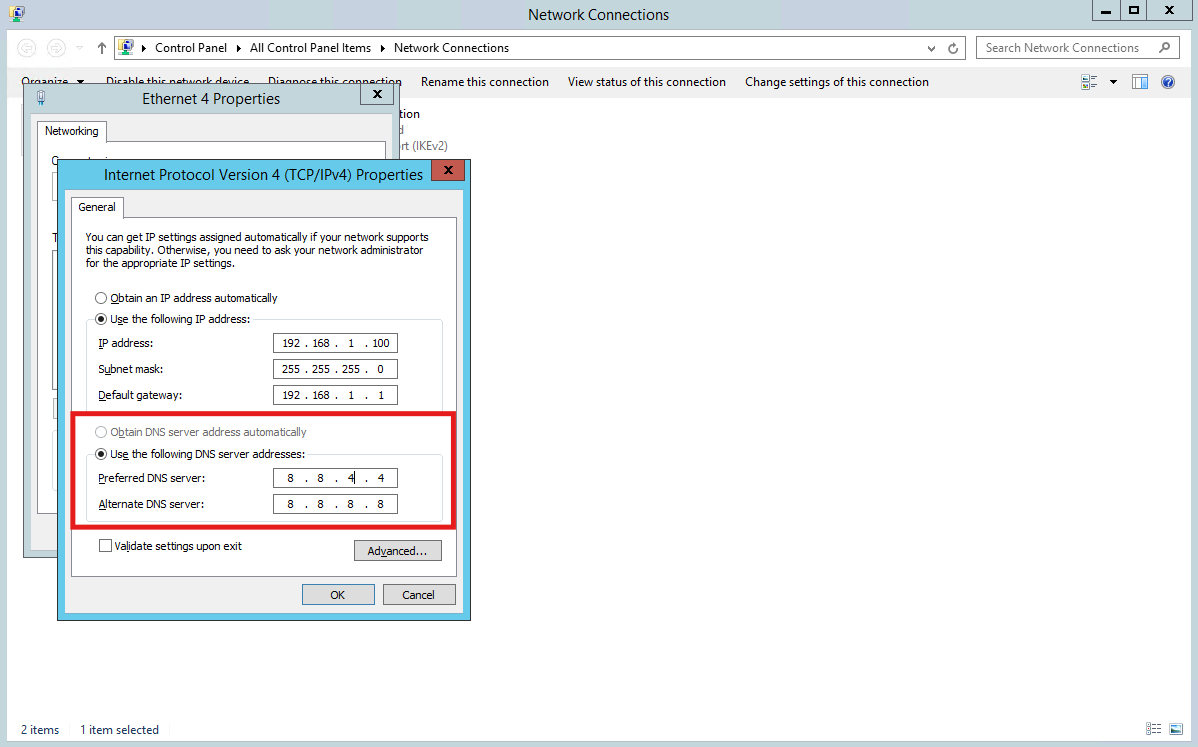
### **Step 6: configure DNS servers (optional)**
1. If needed, select **Use the following DNS server addresses**.
2. Enter your preferred **DNS server** (e.g., `8.8.8.8` for Google DNS) and an **alternate DNS server** (e.g., `8.8.4.4`).
***
### **Step 6: configure DNS servers (optional)**
1. If needed, select **Use the following DNS server addresses**.
2. Enter your preferred **DNS server** (e.g., `8.8.8.8` for Google DNS) and an **alternate DNS server** (e.g., `8.8.4.4`).
 ***
### **Step 7: save changes**
1. Click **OK** to close the TCP/IPv4 Properties window.
2. Click **Close** in the Network Adapter Properties window.
***
### **Step 8: verify the changes**
1. Open **Command Prompt** or **PowerShell** by right-clicking the Start button and selecting it from the menu.
2. Type the following command and press **Enter**:
`ipconfig`
3. Check the output to confirm that your new IP address is correctly set for the network adapter.
***
### Important Notes
* **Admin Privileges**: Changing network settings requires administrative privileges. Ensure you have the necessary permissions.
* **Backup Settings**: Always note your previous network settings before making changes, in case you need to revert back.
***
#### Fast Windows VPS — ready in minutes
Spin up a secure Windows VPS with 2 vCPUs or more. Instant setup, full administrator access, and reliable global performance.
Select your preferred hosting location, plan, select Windows OS at checkout, and start with full RDP access.
***
### **Step 7: save changes**
1. Click **OK** to close the TCP/IPv4 Properties window.
2. Click **Close** in the Network Adapter Properties window.
***
### **Step 8: verify the changes**
1. Open **Command Prompt** or **PowerShell** by right-clicking the Start button and selecting it from the menu.
2. Type the following command and press **Enter**:
`ipconfig`
3. Check the output to confirm that your new IP address is correctly set for the network adapter.
***
### Important Notes
* **Admin Privileges**: Changing network settings requires administrative privileges. Ensure you have the necessary permissions.
* **Backup Settings**: Always note your previous network settings before making changes, in case you need to revert back.
***
#### Fast Windows VPS — ready in minutes
Spin up a secure Windows VPS with 2 vCPUs or more. Instant setup, full administrator access, and reliable global performance.
Select your preferred hosting location, plan, select Windows OS at checkout, and start with full RDP access.