> ## Documentation Index
> Fetch the complete documentation index at: https://docs.edisglobal.com/llms.txt
> Use this file to discover all available pages before exploring further.
# Automatic Installation of MikroTik Router OS (MikroTik CHR)
> Automate MikroTik RouterOS (CHR) installation on an EDIS Global VPS with a one-line script. Step-by-step guide covering setup, config, and Winbox access.
## Introduction
This guide simplifies the process of installing MikroTik Router OS on a VPS. By automating the installation with a script, there’s no need to manually enter commands in the MikroTik CLI console. Once complete, you’ll have a fully operational VPS running MikroTik Router OS.
## Getting started: prerequisites and VPS preparation
Install Debian 13 on VPS
Connect to the server via SSH
Open a terminal and create a script file:
```bash theme={"system"}
nano mikrotik.sh
```
Copy and paste the following script into the file
```bash Script expandable theme={"system"}
#!/bin/bash
set -euo pipefail
# Include sbin paths
export PATH="$PATH:/usr/bin:/bin:/usr/sbin:/sbin"
# Auto-detect target disk (vda vs sda)
if [ -b /dev/vda ]; then
export TARGET_DISK=/dev/vda
elif [ -b /dev/sda ]; then
export TARGET_DISK=/dev/sda
else
echo "ERROR: Neither /dev/vda nor /dev/sda found. Available disks:" >&2
lsblk -d -o NAME,SIZE,TYPE >&2
exit 1
fi
echo "Using TARGET_DISK=$TARGET_DISK"
sudo apt-get update && sudo apt-get upgrade -y
# add parted for partprobe; util-linux provides fdisk
sudo apt-get -y install gzip unzip curl wget util-linux ca-certificates parted
# Latest stable RouterOS v7
latest_version="$(curl -fsSL https://download.mikrotik.com/routeros/NEWESTa7.stable | awk '{print $1}')"
# CHR RAW disk image
ZIP="chr-${latest_version}.img.zip"
IMG="chr-${latest_version}.img"
download_url="https://download.mikrotik.com/routeros/${latest_version}/${ZIP}"
# Download + extract
wget -O "$ZIP" "$download_url"
rm -f "$IMG"
unzip -o "$ZIP" "$IMG"
# Attach image with partition scan
LOOP="$(sudo losetup --find --show --partscan "$IMG")"
sudo udevadm settle 2>/dev/null || true
lsblk "$LOOP"
cleanup() {
set +e
sudo umount /mnt/image 2>/dev/null || true
sudo losetup -d "$LOOP" 2>/dev/null || true
}
trap cleanup EXIT
# Mount partition for injection:
# Prefer p2 first (typically main filesystem) then p1
sudo mkdir -p /mnt/image
MOUNTED=0
for p in "${LOOP}p2" "${LOOP}p1"; do
[ -b "$p" ] || continue
if sudo mount "$p" /mnt/image 2>/dev/null; then
if sudo sh -c 'touch /mnt/image/.writetest && rm -f /mnt/image/.writetest'; then
MOUNTED=1
echo "Mounted writable partition: $p"
break
fi
sudo umount /mnt/image
fi
done
if [ "$MOUNTED" != "1" ]; then
echo "ERROR: Could not mount a writable partition inside CHR image ($IMG)." >&2
exit 1
fi
sync
sudo umount /mnt/image
sudo losetup -d "$LOOP"
trap - EXIT
# Write CHR image to disk
echo u | sudo tee /proc/sysrq-trigger >/dev/null
sudo dd if="$IMG" bs=4M of="$TARGET_DISK" status=progress conv=fsync
sudo sync
# Verify layout best-effort
sudo partprobe "$TARGET_DISK" 2>/dev/null || true
lsblk "$TARGET_DISK" || true
sudo fdisk -l "$TARGET_DISK" 2>/dev/null || true
echo s | sudo tee /proc/sysrq-trigger >/dev/null
echo "Waiting 5 seconds..."
end_time=$((SECONDS + 5))
while [ $SECONDS -lt $end_time ]; do :; done
echo "Reboot OS"
echo b | sudo tee /proc/sysrq-trigger >/dev/null
```
Press `CTRL+O` to save your changes, then exit by pressing `CTRL+X`.
### **Set script permissions**
Set the script execution rights:
```bash theme={"system"}
chmod +x mikrotik.sh
chmod 755 mikrotik.sh
```
### **Run the Script**
```bash theme={"system"}
./mikrotik.sh
```
The VPS will reboot automatically once the installation completes.
### Install settings manually in RouterOS
1. Login to your [VPS Management Portal](https://manage.edis.at/whmcs/clientarea.php)
2. Locate your VPS from the Services tab
3. [**Enable VNC Server**](https://docs.edisglobal.com/enable-vnc-server)
4. Open the noVNC or connect by VNC client
5. Login to the Router OS using **admin** account and **blank password** (no password)
6. Setup new password for admin account
7. Show the name of interfaces:
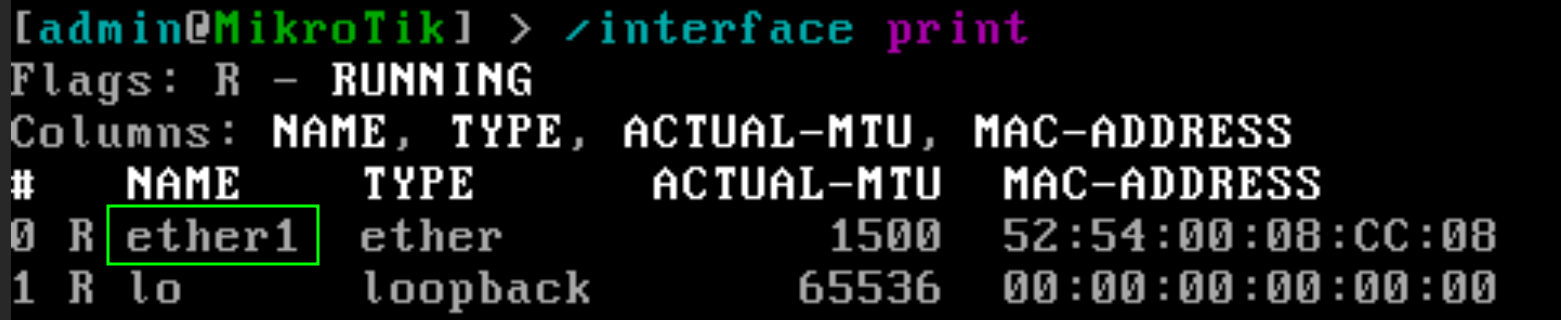 ```bash theme={"system"}
/interface print
```
8. Check your [**Network Information**](https://docs.edisglobal.com/vps-management/ip-address-information#ip-settings,-network-info) in the billing panel. Configure your IP address of the server (**192.168.1.100** - IP address of the server & **ether1** - name of interface):
```bash theme={"system"}
/ip address add address=192.168.1.100/24 interface=ether1
```
9. Configure gateway(**192.168.1.1** - IP address of gateway):
```bash theme={"system"}
/ip route add gateway=192.168.1.1 dst-address=0.0.0.0/0
```
10. Configure DNS:
```bash theme={"system"}
/ip dns set servers=1.1.1.1,1.0.0.1
```
After you have finished configuring Router OS in VNC, connect to MikroTik Router OS using Winbox.
### Connecting to server using Winbox
1. **Download and Install** Winbox from the [MikroTik website](https://mikrotik.com/download).
2. Open Winbox and create a new connection:
• Enter your VPS **IP address**.
• Use admin for the **Login** field and Enter the **Password** that you installed before.
• Click **Connect**.
```bash theme={"system"}
/interface print
```
8. Check your [**Network Information**](https://docs.edisglobal.com/vps-management/ip-address-information#ip-settings,-network-info) in the billing panel. Configure your IP address of the server (**192.168.1.100** - IP address of the server & **ether1** - name of interface):
```bash theme={"system"}
/ip address add address=192.168.1.100/24 interface=ether1
```
9. Configure gateway(**192.168.1.1** - IP address of gateway):
```bash theme={"system"}
/ip route add gateway=192.168.1.1 dst-address=0.0.0.0/0
```
10. Configure DNS:
```bash theme={"system"}
/ip dns set servers=1.1.1.1,1.0.0.1
```
After you have finished configuring Router OS in VNC, connect to MikroTik Router OS using Winbox.
### Connecting to server using Winbox
1. **Download and Install** Winbox from the [MikroTik website](https://mikrotik.com/download).
2. Open Winbox and create a new connection:
• Enter your VPS **IP address**.
• Use admin for the **Login** field and Enter the **Password** that you installed before.
• Click **Connect**.
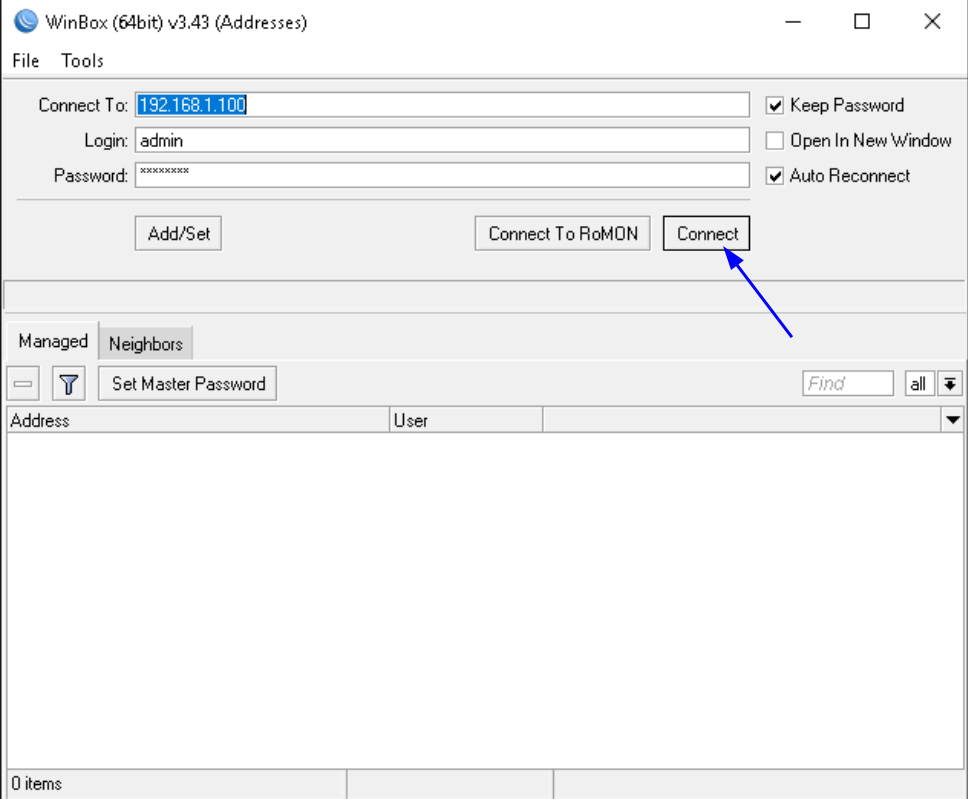 Congratulations! MikroTik Router OS is now successfully installed and operational on your VPS. With the automated script, accessing and managing Mikrotik CHR via Winbox is quick and efficient. After securing your credentials and testing the setup, your infrastructure setup is ready for seamless network management.