> ## Documentation Index
> Fetch the complete documentation index at: https://docs.edisglobal.com/llms.txt
> Use this file to discover all available pages before exploring further.
# MikroTik 6to4 Tunnel Configuration Guide (Router-to-Router)
> Configure a secure MikroTik 6to4 tunnel with IPsec encryption to enable IPv6 over IPv4. Step-by-step guide for reliable router-to-router connectivity.
## Note on Usage and Network Filtering
A **6to4 tunnel** allows two servers in different countries to connect and exchange data as if they were on the same local network.\
Because many network filters are designed mainly for IPv4, traffic sent through 6to4 tunnels can sometimes pass older filtering systems that do not fully inspect IPv6 or encapsulated packets.
> **Important:** This information is provided for general awareness.\
> While this behaviour can be useful for testing and research, tunnelling technologies must **not** be used to bypass lawful restrictions or government-imposed filtering.\
> Always follow local regulations and your provider’s acceptable use policy.
## **Introduction**
A **6to4 tunnel** encapsulates IPv6 packets inside IPv4 packets, allowing IPv6 communication across IPv4-only networks.
This is particularly useful when your **ISP does not support native IPv6**, but you want IPv6 connectivity between sites.
You typically need a 6to4 tunnel in the following cases:
1. **Your devices are in two IPv6 networks** but your provider doesn’t route IPv6 between them.
→ The 6to4 tunnel bridges the two IPv6 subnets using IPv4 transport.
2. **Your provider doesn’t support IPv6**, but you want to send IPv6 traffic over IPv4 infrastructure.
→ The 6to4 tunnel encapsulates and forwards IPv6 packets between locations.
In this example, we’ll divide an IPv6 prefix fe::/32 into two subnets and configure a **point-to-point 6to4 tunnel** between **Mikrotik 1** and **Mikrotik 2**, secured with an **IPsec secret**.
***
## **Network Topology**
| Device | IPv4 Address | IPv6 Tunnel Address | IPv6 Subnet | Role |
| -------------- | ------------- | ------------------- | ---------------- | ------------- |
| **Mikrotik 1** | 45.153.127.87 | fd::1/126 | **fe::/33** | Local router |
| **Mikrotik 2** | 45.151.73.213 | fd::2/126 | **fe:8000::/33** | Remote router |
📘 The original IPv6 prefix fe::/32 is divided into two halves:
* **fe::/33** → used on Mikrotik 1’s network
* **fe:8000::/33** → used on Mikrotik 2’s network
Each router will route traffic between these subnets via the secure 6to4 tunnel.
## **Getting started: prerequisites**
Before you begin:
1. Ensure both MikroTik routers have **public IPv4 addresses** (no NAT).
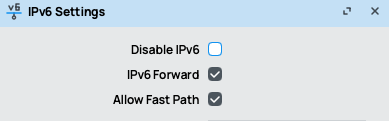
2. Enable the **IPv6 feature** (RouterOS v7 syntax):
```bash theme={"system"}
/ipv6/settings/set disable-ipv6=no
```
🟢 This command enables the IPv6 stack globally in RouterOS v7.
 3. Access both routers via **Winbox** or **SSH**.
4. This guide is written for **RouterOS v7.x** (v7.12 or later recommended).
## **Step 1 – create the 6to4 tunnel interface**
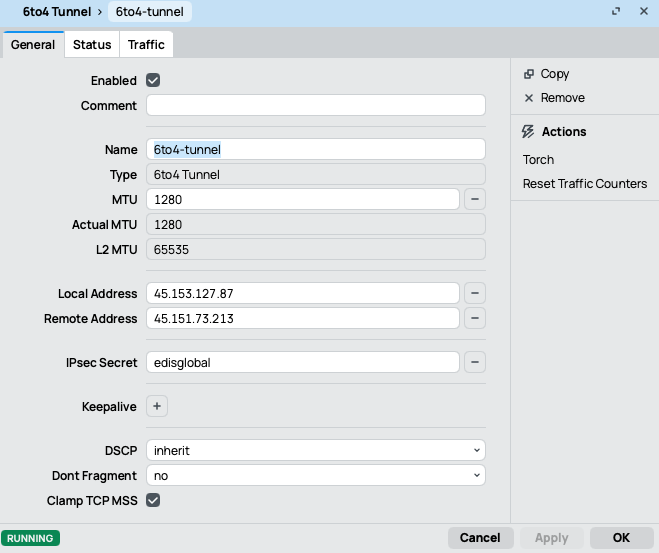
Create a 6to4 tunnel on both routers, specifying the local and remote IPv4 addresses, and enable IPsec encryption using an ipsec-secret.
### **On Mikrotik 1**
```bash theme={"system"}
/interface 6to4 add local-address=45.153.127.87 remote-address=45.151.73.213 mtu=1280 name=6to4-tunnel ipsec-secret=edisglobal
```
3. Access both routers via **Winbox** or **SSH**.
4. This guide is written for **RouterOS v7.x** (v7.12 or later recommended).
## **Step 1 – create the 6to4 tunnel interface**
Create a 6to4 tunnel on both routers, specifying the local and remote IPv4 addresses, and enable IPsec encryption using an ipsec-secret.
### **On Mikrotik 1**
```bash theme={"system"}
/interface 6to4 add local-address=45.153.127.87 remote-address=45.151.73.213 mtu=1280 name=6to4-tunnel ipsec-secret=edisglobal
```
 ### **On Mikrotik 2**
```bash theme={"system"}
/interface 6to4 add local-address=45.151.73.213 remote-address=45.153.127.87 mtu=1280 name=6to4-tunnel ipsec-secret=edisglobal
```
🟢 The ipsec-secret parameter automatically encrypts the 6to4 traffic using the shared key **edisglobal** for secure communication.
## **Step 2 – assign IPv6 addresses**
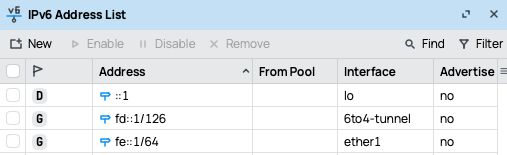
Assign IPv6 addresses to the 6to4 tunnel for connectivity and to each router’s internal network using their respective /33 subnets.
### **On Mikrotik 1**
```bash theme={"system"}
# Tunnel address
/ipv6/address/add address=fd::1/126 interface=6to4-tunnel advertise=no
# LAN address
/ipv6/address/add address=fe::1/64 interface=ether1 advertise=no
```
### **On Mikrotik 2**
```bash theme={"system"}
/interface 6to4 add local-address=45.151.73.213 remote-address=45.153.127.87 mtu=1280 name=6to4-tunnel ipsec-secret=edisglobal
```
🟢 The ipsec-secret parameter automatically encrypts the 6to4 traffic using the shared key **edisglobal** for secure communication.
## **Step 2 – assign IPv6 addresses**
Assign IPv6 addresses to the 6to4 tunnel for connectivity and to each router’s internal network using their respective /33 subnets.
### **On Mikrotik 1**
```bash theme={"system"}
# Tunnel address
/ipv6/address/add address=fd::1/126 interface=6to4-tunnel advertise=no
# LAN address
/ipv6/address/add address=fe::1/64 interface=ether1 advertise=no
```
 ### **On Mikrotik 2**
```bash theme={"system"}
# Tunnel address
/ipv6/address/add address=fd::2/126 interface=6to4-tunnel advertise=no
# LAN address
/ipv6/address/add address=fe:8000::1/64 interface=ether1 advertise=no
```
## **Step 3 – add IPv6 routes**
Each router must know how to reach the other router’s /33 subnet through the 6to4 tunnel.
### **On Mikrotik 1**
```bash theme={"system"}
/ipv6/route/add dst-address=fe:8000::/33 gateway=fd::2
```
### **On Mikrotik 2**
```bash theme={"system"}
# Tunnel address
/ipv6/address/add address=fd::2/126 interface=6to4-tunnel advertise=no
# LAN address
/ipv6/address/add address=fe:8000::1/64 interface=ether1 advertise=no
```
## **Step 3 – add IPv6 routes**
Each router must know how to reach the other router’s /33 subnet through the 6to4 tunnel.
### **On Mikrotik 1**
```bash theme={"system"}
/ipv6/route/add dst-address=fe:8000::/33 gateway=fd::2
```
 ### **On Mikrotik 2**
```bash theme={"system"}
/ipv6/route/add dst-address=fe::/33 gateway=fd::1
```
✅ **Explanation:**
* fe::/33 → local network of Mikrotik 1
* fe:8000::/33 → remote network on Mikrotik 2
* The gateway value is the **remote IPv6 tunnel address** (fd::1 or fd::2).
Now, both routers can route IPv6 traffic between their subnets through the 6to4 tunnel.
## **Step 4 – test the tunnel**
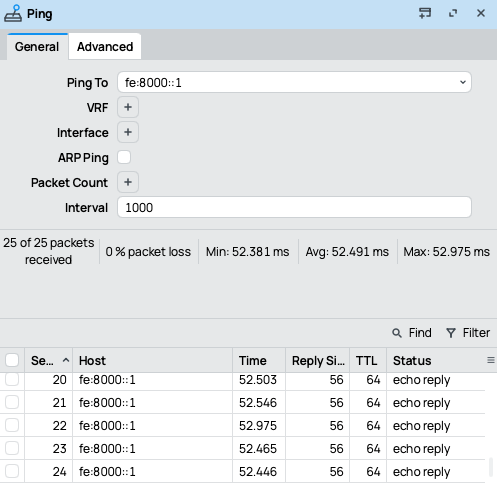
Test IPv6 connectivity between both routers and their LANs.
### **From Mikrotik 1**
```bash theme={"system"}
/ping fe:8000::1
```
### **On Mikrotik 2**
```bash theme={"system"}
/ipv6/route/add dst-address=fe::/33 gateway=fd::1
```
✅ **Explanation:**
* fe::/33 → local network of Mikrotik 1
* fe:8000::/33 → remote network on Mikrotik 2
* The gateway value is the **remote IPv6 tunnel address** (fd::1 or fd::2).
Now, both routers can route IPv6 traffic between their subnets through the 6to4 tunnel.
## **Step 4 – test the tunnel**
Test IPv6 connectivity between both routers and their LANs.
### **From Mikrotik 1**
```bash theme={"system"}
/ping fe:8000::1
```
 ### **From Mikrotik 2**
```bash theme={"system"}
/ping fe::1
```
## **Troubleshooting**
If the tunnel doesn’t work as expected:
* Confirm both routers have **public IPv4 connectivity**.
* Check that IPv6 is **enabled globally**.
* Ensure the same ipsec-secret value is used on both routers.
* Allow **protocol 41 (IPv6 encapsulation)** and **IPsec traffic** in the firewall.
* Keep MTU set to **1280** to avoid fragmentation.
## **Conclusion**
You’ve successfully configured a **secure 6to4 tunnel** between two MikroTik routers running RouterOS v7.
This setup connects two IPv6 subnets (fe::/33 and fe:8000::/33) over IPv4, with automatic IPsec protection using the shared secret edisglobal.
### **From Mikrotik 2**
```bash theme={"system"}
/ping fe::1
```
## **Troubleshooting**
If the tunnel doesn’t work as expected:
* Confirm both routers have **public IPv4 connectivity**.
* Check that IPv6 is **enabled globally**.
* Ensure the same ipsec-secret value is used on both routers.
* Allow **protocol 41 (IPv6 encapsulation)** and **IPsec traffic** in the firewall.
* Keep MTU set to **1280** to avoid fragmentation.
## **Conclusion**
You’ve successfully configured a **secure 6to4 tunnel** between two MikroTik routers running RouterOS v7.
This setup connects two IPv6 subnets (fe::/33 and fe:8000::/33) over IPv4, with automatic IPsec protection using the shared secret edisglobal.